Category Archives: FPV Ground station

Charge! My Portable Charging Station

This is my portable charging station.  Materials to wit:

1) Pelican/PVC Case.
2) 1 set of 2 units HP power supply pumping out 12v/24v x 1800watts (intentionally oversized for future proofing!)
3) 1 Turnigy Reaktor 250W
4) 2 pcs 4″x 5″x 2.2″ plastic containers (for the small stuff)
5) 1 pc Lipo Bag
6) 5 strips of Velcro Extreme (used to stick the charger, power supply and plastic containers to the case)
7) 2 sets regular Velcro (for the parallel board)
8) 3M Double-sided tape to stick the aluminium pan to the case.
9) 1 pc 7.5″x 11″x 3″  aluminium baking pan
10) 1 unit LiPo Parallel Charging Board

Charge!icarusfpvchargingstation

Turnigy Reaktor 250W 10A Charger Balancer Rocks! (so far!)

If you’re reading this and just started with the hobby, let me give you a piece of advice to save your LiPos and hard-earned money:

  1. Get a good balancer charger and
  2. Do not charge each LiPO cell to the max of 4.2v, charge instead at 4.1v or 4.15v. This will make the lipos last longer — as much as twice the cycles/lifespan.

I’ve had this generic B6AC+ 80watt AC/DC charger for a little over 3 years now, my first one in fact and its seems to work ok, but I noticed that a big percentage of my lipos are puffing up. At first I attributed this to my usage, but with mainly planes used for FPV and not being an aggressive flyer at all, I found this strange.

IMG_6253

Fast forward recently and with about 25 Lipos of varying cell counts and capacities, half of them have puffed, somethings not right! I can’t be the most stupid RC flyer out there!

What really convinced me was when I bought a 3S 2200mah JRPropo battery. After a couple of cycles, the 3rd cell is always 10% higher in charge and often exceeds 4.2v when trying to charge.  No matter how often I discharge and how long I charge it (balanced of course), the first 2 cells can not get the 4.2v full charge.  Checking the battery with  a fellow flyer’s Powerlab 8 v2 showed that the 3rd cell has twice the resistance as the first 2, however unlike my charger the cellpro is trickling charge into the first 2 cells attempting to catch up with the 3rd.  I didn’t complete it though as I had to leave the field.

So bottom line, the charger had to go.  But what to choose? the Powerlab 8? iCharger? Reaktors? I eventually decided to get the Turnigy Reaktor 250w 10A from HK. It’s cheap (< US$50), full featured (it being a copy of the iCharger 106B+) and looks really cool too.  Fortunately, I also found a local supplier of a good power supply (360w) for it:

IMG_6239

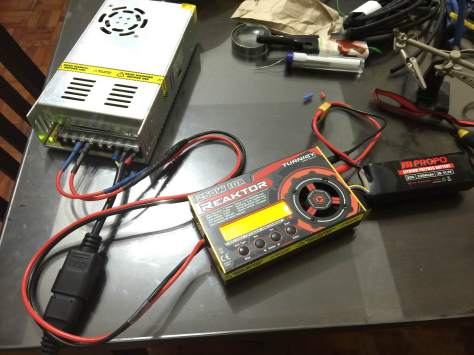
So the verdict? this small charger did a lazarus on my LiPO above! after setting the termination voltage at 4.15v (I can’t do this with my old charger).  I proceeded to do balanced charging.

The image below shows the charging several minutes after I started.  This shows cells 1 and 2 catching up to cell 3, which was pared down to 4.15 (it was registering 4.21v at the beginning) by the charger and maintained at that charge all throughout the charging cycle.
IMG_6241

An hour later, I got fully balanced battery charged at 4.15v each cell!

IMG_6250

I’m beginning to really like this charger.. here’s the balanced cells.

IMG_6248

So if you’re thinking of getting a 2-6s charger, this small charger is very capable.  Full-featured, adequate power to handle high C charging and best of all, cheap!

EzUHF out of the box

I got the  ImmersionRC EZUHF transmitter and diversity receiver a couple of weeks ago. The transmitter package includes:  the antenna, the transmitter box, head tracker cable, power cable with an open wire, and a transmitter to rc controller cable (in this case for a futaba).   Obviously, since I’m using a Spektrum 6i I have to replace the futaba plug with a 3.5mm mono plug for the 6i’s trainer port.

ezuhf1


The receiver comes with a data cable (for EzOSD which I didnt get) and the two diversity antennas.

ezuhf2


The first thing  I did was upgrade the firmware of the BOTH (must be the same FW version) the transmitter and receiver to v1.43 which includes their ‘Extreme Hopping’ mode (ie frequency hopping in a larger 20Mhz band instead of the default 2Mhz).


Creating a 12v distribution hub for FPV components

Making a simple power distribution hub is easy.  However, to make sure things will work and not result to magic smoke, make sure that:

  1. All electronics that will be used for this must have the same voltage (e.g. all 12v or all 5v)
  2. You MUST know the maximum power draw in Amps of all the components that may or will be connected to this hub.  Refer to your electronics documentation to get the maximum amp draw and add them all up.

Next, prepare the materials:

  1. Get a UBEC suitable for a) the voltage and b) the maximum Amp draw of all your components.  In this example, I’m making a power distribution for my portable FPV ground station which is attached to my transmitter.  My components consists of a 7″ LCD, the AV receiver and (soon!) an EzUHF LRS transmitter.. all of which draws a maximum of 1.8A. This means a 2.5A UBEC at a minimum should be enough (it wont hurt if we get something with a higher Amp output).  This 12v 2.5A UBEC from HK is adequate for my purpose.
  2. A male XT60 or Deans plug, a servo extension (this is optional in case you dont want to hardwire distribution plugs to the UBEC) and several female JST cables. Of course this assumes that all your components will have JST male power plugs as well =)   Anyway, here’s the materials prior to assembly:
L to R: male XT60 (to connect to LiPO batt), UBEC, (optional) extension cable and then the JST female plugs.

Finally, solder them all together making sure that the positive wires are connected to the correct connectors otherwise.. poof!  Ok here’s the end product:

Custom made 12v 2.5A power distribution. Need a bigger Amp? simply unplug the servo extension and replace the UBEC.
Custom made 12v 2.5A power distribution. Need a bigger Amp? simply unplug the servo extension and replace the UBEC.  Note that I added an extension between the XT60 plug and the UBEC, the longer wire means more flexibility for my application.

Make sure to use heat shrink tubing to insulate soldered connections.